Lay the parachute on it's side and fold it like an accordion.
The following chart is to be used as a guide to determine the severity of the damage
you may find. If you find damage not described here consult the manufacturer.
| Inspection item |
Possible cause of damage |
remedy |
comments |
| Fabric |
|
|
|
| Holes |
Abrasion from gravel, twigs,
pavement, people walking on the parachute while it is deflated, etc. |
If only one ripstop square is
affected, leave it alone. If four or more are affected, temporarily cover with sticky back
rip stop tape. If you have 4 or more holes within a 12" square, your parachute
needs immediate attention. |
There is a large difference
between a hole and a tear. Tears need immediate attention. A hole can develop into a tear,
so be sure to keep an eye on all holes. |
| Tears 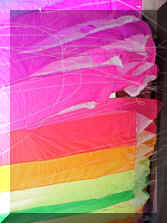
|
Small cuts from sharp objects
catching on the material, razor grass, barbed wire, getting caught on your vehicle, or
people walking on the parachute while it is deflated. |
Patch the tear using conventional
parachute patching guidelines. For greater detail consult The Parachute Manual by Daniel
Poynter. |
Tears are subject to ripping
dependant on the current strength of the material. Faded or worn material will rip more
easily than new material. All tears are cause for grounding. Tears can rip and you
cannot do anything about it once you are in the air. |
| Snags in the
material |
Dragging the parachute on sharp
objects such as prickers, razor grass, gravel or rough cement. Material contacting
Velcro hook or zippers. |
If three or more fibers are
pulled from the weave of the material a patch will be required. If you have 4 or more
snags within a 12" square of material, patch immediately. |
If the snags are minor you can
sometimes work the fibers back into place by tensioning the area with your fingers and
working the material using an up and down movement. Another possibility is using a pencil
eraser to help work the fibers back into place. |
| Faded material |
Ultraviolet degradation. |
Have a professional evaluate the
existing strength of the material. |
Most current fabric manufacturers
use effective UV inhibitors. Older powered parachutes may show more weakness due to the
materials used. |
| Discoloration due
to outside substances 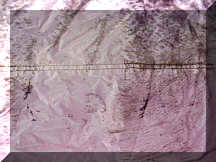
|
Oil, grease, plant secretions,
spills, squashed bugs. |
Determine if the substance was
alkaline or acidic and wash accordingly. |
Use a mild soap, rub gently and
rinse well. Only wash the affected area since some materials are adversely affected by
water. |
| Pinched or
severely wrinkled material |
Fabric caught in prop, pulleys,
engine or landing gear. This is a strong indicator that further inspection is necessary. |
Hold the affected area up to the
light and inspect for damage such as broken fibers and threads. Gently pull the affected
area, or use the riggers thumb test, to see if it easily tears. If it shows any sign of
weakness, have it professionally repaired. Try to determine where or how the material
became wrinkled so you can make a special effort not to let it happen again. |
If the material was tightly
stretched i.e. had become tangled in a rotating prop or axle, it was likely damaged beyond
safe use and needs to be inspected by a professional. If you have not been properly
trained to do a thumb test you could further damage the material. |
| Hard or stiff
areas |
Fabric melted due to contact with
extreme heat (220 degrees or more). This is most likely due to fabric dragging across the
engine. |
Determine the extent of the
damage using a rigger’s thumb test and patch as necessary. If you have not been
properly trained to do a thumb test you could further damage the material. |
It does not take long for heat to
damage small portions of your parachute beyond safe use. Thoroughly inspect any portion of
your parachute or lines that may have come into contact with anything hot. |
| Seams |
| Loose Threads |
Poor tension during manufacture. |
If you can pull the seam apart
1/32" or more at the loose stitching the area must be re-sewn. |
If you see an area with many loose
threads, check to make sure there is stitching connecting them. |
| One continuous
thread running along the seam |
Sewing machine operator ran out
of bobbin, sewing machine is skipping stitches. |
Re-sew seam immediately. |
Sometimes a seam can look like it
is correct from the top but it is actually held together by one thread wedged in and out
of the material. This can hold together for a period of time then pull apart. Inspect both
sides of each seam. |
| Broken stitching 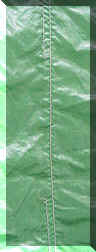
|
Abrasion, poor stitch tension,
poor thread quality, razor grass, alfalfa stubble. |
If 3" or more of one row of
stitching is broken in a double stitched seam, reinforce immediately. If one seam has 2 or
more effected areas, reinforce immediately. If one parachute has 3 or more seams with
broken stitching, reinforce immediately. Any one seam with 6" or more of missing
stitches ground immediately. |
Any structural area of your
parachute that is missing stitches should be grounded immediately. |
| Reinforcement
Tapes |
| Nicks extending
over 1/4 the width of the tape |
Abrasion or getting caught on
sharp objects. |
Send your canopy to the
manufacturer for repair. |
Tapes are usually located at the
leading edges of each cell, on the load ribs, around the stabilizers and at the trailing
edge. Sometimes they are exposed and sometimes they are rolled inside the material. |
| Nicks extending
less than 1/4 the width of the tape |
Abrasion or getting caught on
sharp objects. |
Preflight that area after each
flights to be sure the situation is not getting worse. Have it repaired at your earliest
convenience. |
Do NOT cover the affected area. It
is important that you can easily monitor the damage. |
| Broken tapes |
Over loading the tape,
environmental factors and sharp objects. |
Do not fly! Send to manufacturer
for repairs immediately |
|
| Line
attachment points |
| Loose stitching |
Sewing machine tension off or
unusual strains placed on the line due to snags or other restrictions. |
Re-sew immediately. |
|
| Torn or worn
webbing loops |
Over loading the parachute. |
Replace immediately. |
|
| Straight line
stitching overlapping 4 or more times |
Manufacture or improper repair. |
Consult manufacturer. |
An area with too much stitching
may actually weaken the material. Failure of certain line attachments can prove to make
controlling your flight extremely difficult. |
| Stitching has
overlapped the tape and gone into the material. This is more likely to happen on line
attachments sewn with a single sew line |
Sewing machine operator sewed too
far. |
Consult Manufacturer. |
When the parachute is under load
this over sew can cause undo strain on the fabric. The strain can cause a hole that can
then become a tear. (Pointloading) |
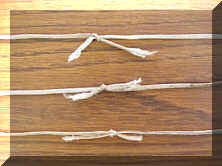
| Lines |
Broken lines |
Abrasion caused by rubbing, or
environmental factors, mufflers, cylinder heads. |
Replace immediately with factory
lines or do a proper field splice. Make sure there are no knots. The end result
must be a line that is the proper length when compared to its matching line on the
opposite side of the parachute. Note: Be sure to pull both lines with 15 pounds tension
when comparing line symmetry. |
DO NOT tie broken lines together
in an attempt to fly. Tying any line or lines together is extremely dangerous. |
| Snags in lines |
Getting caught on a variety of
objects. |
More than 3 snags within a
12" distance, replace the whole line. |
|
| Hard spot in line |
Friction or heat damage. |
Replace immediately. If your
Steering line is affected, do not fly! |
|
| Line sheathing is
worn |
Rubbing. |
Replace line immediately. |
Once the sheathing wears through
your line may stretch and cause problems in flight. |
| Lower steering
line fraying |
Abrasion caused by the steering
line guide system. |
Replace the line. Although the
material used on many lower steer lines will retain much of its strength even though the
sheathing is worn through, you can still experience stretching that will change the
performance and "feel" of your parachute in flight. |
Fixed pulleys and rings are prone
to cause severe abrasion when the pull angle is not lined up exactly right. Articulated
pulleys (freely moving from any direction) are less susceptible to contributing to this
kind of damage. |
| Cross line,
‘E’ line or ‘F’ line damage |
|
Replace soon. |
While your Parachute will still
fly full performance has been changed and possibly compromised. |
| Stabilizer or
‘A’ line damage |
|
You are grounded. Replace
immediately. |
Do not fly…Very dangerous if
it should happen to break in flight! |
| Lines
"out-of-trim" |
Extended use, excessive loading,
repeated high force maneuvers at high wing loading. |
A qualified technician should
verify the relationship of all lines to the design baseline. If "out-of-trim",
all the lines should be replaced. |
Parachutes that are "out-of
trim" will not perform as when new. If your wing is no longer flying like it once
did, and the wing has 200 hours or more flight time, your lines should be checked. |
| Lines you suspect
have been stretched |
Tangled with propeller, tangled
in landing gear, became wrapped around axle. |
Check the line for symmetry with
corresponding line. If you have a difference of 2.0" or more replace the line
immediately. |
If this is an ‘A’ line,
do not fly. If it is up to 3 other lines, replace as soon as possible and understand that
flight performance has been changed and possibly compromised. |
| Flying
Cables, Flying Risers and Connector links (Maillion Rapide) |
Connector link
does not open or close smoothly
 |
Rust, corrosion, dirt, not fully
tightened before first flight. |
Replace your link with the
appropriately sized stainless steel Maillion Rapide Link from your vehicle or parachute
manufacturer. |
If you are not sure if your quick
link is stainless steel do a magnet test. A magnet will not affect a stainless steel
fitting. |
| Flying Cables
twisted |
Parachute twisted through itself
when handled, or improper assembly. |
Untwist the parachute or re-rig
the Flying cables, connector links, and steering so there are no twists. Note: Do not
remove the lines from the links. |
Twisted flying cables inhibit
your ability to steer if the twist causes the lower steering line to go around the cable. |
| Flying cables or
flying risers shows signs of nicks, wear or fading |
UV exposure, rubbing or other
abrasion. |
Replace |
The potential for a single point
failure is not worth the risk of flying with damaged cables, risers or links. |
| Stuff
Bags, Line sleeves and Connector Links |
| Inspection
Item |
Comments |
| Velcro Hook and
zipper on Stuff Bag |
Inspect carefully for
threads or other signs of parachute or line fibers. If present try to locate the damaged
area and proceed accordingly. When stuffing parachute into a bag, roll the Velcro hook
to the outside of the bag before inserting canopy and lines. |
| Velcro hook or
zipper on line sleeve |
Inspect carefully for
signs of line or parachute damage. Adjust your line sleeve placement technique to insure
no contact with Velcro or Zipper. |
| Connector Links |
1) Open links equal real danger.
2) Lines that are loose on the links (no link guards) can get caught on and damaged by
the nut.
3) Routing of the suspension lines, links, cables, steering guide ring or pulley, and
lower steering line, are directly related to the pilots ability to control the wing.
|
| Inflating
your parachute before you fly |
| Listen to your wing |
As your parachute
pressurizes listen to how it sounds. If you hear anything strange stop, turn off your
engine and inspect your wing. If you have had some damage to your wing listen for ripping
sounds. |
| In-flight |
|
| Listen to your wing |
Become familiar with
all the sounds you hear in normal flight so you can identify anything that may be new or
strange. |
| Surface Panel Material Type |
Performance strong points |
Performance weaknesses |
Recommended airtime limit
and comments |
| 1.9 ounce Nylon rip stop with polyurethane
coating. (This was used in a
very limited number of parachutes in the mid and late 1980’s.) Note: the actual
fabric weight is 2.1 to 2.3 ounces per square yard. |
Readily available, tear strength of 8 to 10
pounds |
Parachute weight was excessive, making it
difficult to handle, inflate, and fly. Flight performance is also affected by the
excessive fabric weight. Poor quality UV inhibitors allow for the early demise of a wing
made from this fabric |
150 hours flight time |
| 1.1 ounce (F111, Exacta Chute, MIL-C-44378)
nylon parachute cloth. Silicone treated. Note: the actual fabric weight is 1.2 to 1.3
ounces per square yard. |
Low permeability when new (0-5 cfm), readily
available, light- weight, tear strength when new of 4 – 6 lbs. |
Absorbs water and deforms shape when flown
wet. Permeability increases rapidly after 20 hours flight time. Parachute fabric has
less resistance to stretch than stabilized fabrics. |
200 to 300 hours flight time or less if you
experience inflation difficulties or increased stall tendency. |
| ľ ounce nylon spinnaker cloth, or equivalent
urethane impregnated nylon cloth. Note: the actual fabric weight is 1.2 to 1.3 ounces
per square yard. |
Low stretch characteristics, zero air
permeability. This is a stabilized cloth. It holds the designed shape better than
traditional parachute cloth. |
Tear strength of 1.5- 3 lbs. Creased areas
become weakened over time. |
150 hours flight time Note that many of
today’s parachutes use spinnaker cloth for the vertical ribs of the wing. In this
location, and properly reinforced, the spinnaker cloth will last an expected 750 hours of
flight time. |
| Soar-Coat / PN4 / Blue or equivalent 1.1 ounce
silicone impregnated, nylon cloth. Note: the actual fabric weight is 1.2 to 1.3 ounces
per square yard. |
High tear strength of 10 lbs. in both warp and
fill direction. Zero porosity even after multiple washings, improved UV inhibitors,
silicon coating improves snag resistance |
Colors fade quickly (noticeable within 50
hours of flight time) and the fabric weakens due to UV exposure. More difficult to
inflate than a stabilized cloth. May require stiffer ribs or other design considerations
to improve inflation and pressurized shape. |
750 hours flight time assuming no structural
damage. |
| MO Powered Parachute cloth 1.0 ounce
urethane impregnated, stabilized, zero porosity, nylon cloth
Note: the actual fabric weight is 1.2 to 1.3 ounces per square yard. |
Stabilized weave, high tear strength (5 lbs.),
constant zero porosity, exceptional UV resistance lasting up to 4 times longer than
traditional parachute fabrics. Easier to inflate. Tends to hold designed shape in
flight, which improves airflow and performance. |
Color fade becomes noticeable in about 200
hours of flight time due to UV exposure. |
We expect 2000 hours flight time. This fabric
will soon be available on select powered parachute canopies. |
Damaged or "out-of-trim" line sets can be replaced when your parachute is
still airworthy. A damaged line set may also be "out-of-trim". Therefore, your
parachute may perform differently (more like new) once you replace the line set.
All field repairs require monitoring for further damage. If some repairs are done wrong
they can stress adjacent areas. Below are a few tips to help you perform safe field
repairs:
As George Worthington once said "I’d rather be on the ground wishing I was in
the air than in the air wishing I was on the ground".
Briefly we would like to go over some general reasons to ground your wing. This list is
far from complete since it pertains only to your parachute and not the hardware, engine or
cart.
Holes in your parachute: Although you can still fly with a hole even as large as
your fist, when that hole becomes ˝ the size of the opening at the mouth of a cell, that
cell will not pressurize as needed for proper performance. Your parachute will not fly as
designed and may be dangerous
Tears: Remember, it does not take much for holes to become tears and tears to start
to rip. Any torn parachute should be grounded. You cannot stop a tear once you are in the
air!
"Out-of-trim" lines: This one that creeps up on you. While wings rigged
with Dacron (polyester) lines are more likely to go out-of-trim, all wings should be
monitored for changes in performance. You know how your wing flew when it was new,
remember this and make it your personal performance baseline. Notice if your wing is
reacting differently during inflation or during a maneuver that you perform regularly.
Notice how your wing performs with extra weight (higher wing loading). Recognize when
performance changes or appears to change, and inspect your wing. If it appears
"out-of-trim", don’t fly it.
Broken Lines Tied together: There is no way to predict how your parachute will
react to even one tied line. There are too many variables to predict its performance. It
is simply too dangerous to fly a parachute with any tied lines. Don’t do it!
Damaged Lower Steering Line: Most powered parachute wings today have safety
steering lines. These lines provide a reference for the lower steering line tie-off, and
will keep all the upper steering lines in position, should the lower steering line break.
However, If you tied your lower steering lines "tight" i.e. pulled in 6 to 10
inches extra for a better climb rate, and one steering line breaks, Your wing will go into
a constant turn that you will not be able to control. Therefore, set your lower steering
using the safety line and NEVER FLY WITH DAMAGED LOWER STEERING LINES.
Your Powered Parachute inspection requires you to touch, feel, look and listen to your
parachute. There is nothing mystical or magical about your parachute. The more you learn
about how and why it works the way it does, the better you can evaluate the airworthiness
of your wing.
This article is not to be used as a replacement for having regular inspections as
recommended by the manufacturer. It is meant to be a guide for you to evaluate the
necessity of repairs in-between normal inspection cycles.
It is our hope that you will continue to learn all you can and enjoy many years of safe
flight.
Bill Gargano has been designing and building powered parachutes since 1983. He is
considered one of the leading parachute designers as is evidenced in his current
involvement with NASA’s X-38 project. In that project he is one of two parachute
designers responsible for the parafoil that, in an emergency, will hopefully fly the X-38
and its passengers from the space station safely back to earth.
Betty Pfeiffer has been building emergency reserve parachutes for hang gliding and
paragliding since the early 80’s. She has authored numerous articles on parachutes
and regularly gives parachute safely clinics around the country. In 1997 she received the
USHGA Commedation award for her work in promoting safety through education and product
improvements.